 |
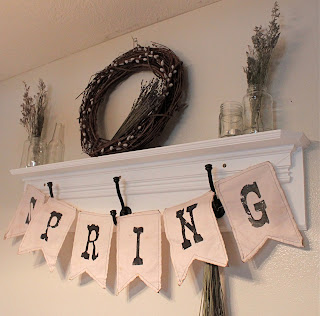
| This is what this tutorial is for, isn't it stunning!? I think so! |
 |
| Just another check to make sure this is really what I wanted... |
 |
| IRON IT ON, BABY! |
 |
| Take a step back, and admire your labor of love. |
 |
| I added another element to the pennants. I singed the edges with a lighter, just enough to give it a faux patina. |
 |
| I do this a lot. I love to look at what I've done so far, so here's another pic of me admiring my awesomeness. |
 |
| And... hang it up! I am so in love with this project. This is the one time that it turned out EXACTLY how I wanted! I am so proud of myself. :} |
 |
| My wonderful Dad made this shelf for me, he's the greatest. |
 |
| And, I just love the hardware on it too! |
What projects have you done to help you remember/celebrate Spring or Easter?
I do apologize for the red in the pictures, lighting in a condo isn't always the greatest... I would also LOVE it if you would follow my blog, it makes me so happy to get new friends, and establish new relationships!
Linking to: Anything You Want Wednesday at Free Pretty Things For You
Thrifty Thursdays
Under $100 Party
No Minimalist Here
White Wednesday
Vintage Inspiration Fridays
Air Your Laundry at Freckled Laundry
Flaunt it Friday at Chic on a Shoestring
Show and Tell Friday
Decor to Adore
Weekend Wrap Up Party @ Tatertots and Jello


19 comments:
Erin it looks stinkin SWEET! I really love it!!
Looks amazing! Thanks for sharing.
Erin! I love your little creative brain. Keep it up! And then post it.
Cool banner! I love how you gave it an aged feel.
~Amanda
Love the vintage look of the banner.
Wow, finally............could not get the comment box to come up for some reason and I clicked on it a jillion
times!! lol
Hi Erin,
Anyway, love your cute spring banner, just adorable and looks so lovely stretched across your shelf,
I actually thought it was a mantle.
Your dad did an awesome job on the shelf as well, and you have it decorated so sweetly too.
Now I have to say I think you were brave to singe that baby, I would be afraid It would go up in flames after all that hard work!! lol
You really did a great job on it hon.
Blessings, Nellie
I'm visiting from Beyond the Picket Fence. Love the look your created with this fun spring banner. Taking the lighter to the edges gives it a great look! Your "mantel" area looks great as well!
I host a weekly linky party on Tuesdays called Terrfic Under Ten. It's for projects made for $10 or less. I would love to have you link up sometime!
Hi Erin, Your banner is adorable and I love the lavender in the jars. Thanks for sharing this cute Spring project at my party.
Hugs,
Sherry
I absolutely adore this project! I am hosting a Springtime Craft and Project linky party today and I would love it if you would particpate.
There is a giveaway involved. :)
I Love the Banner & Thank You for Sharing with us....
Great idea, love the "vintagy-ness" of it!! Thanks for linking up with VIF, xo Debra
This is so perfect! Love the way you did the letters -- so vintage!
Very pretty, love the font for the banner.
Looks good! You SHOULD be proud of it :D Have a nice weekend :) Grete
I love your banner! You can print on fabric!...just iron muslin to freezer paper and cut it to fit your printer...then print away!
Have a great day!
For those of you who don't have email attached to your profile, I just want to say a HUGE thank you to you all. Your comments lifted my spirits this week. I really do appreciate the time you took out of your busy lives to check out my project, and leave a comment!
Love from,
Erin
That looks really easy. I love the antiqued look!
I love your spring banner. I am inspired to make one myself. I have everything I need to get it done, I just have to give it a try. Thanks for the inspiration. I saw your project featured at Air Your Laundry at Freckled Laundry.
Lovin this banner, you did an awesome job. I like the whole wall decor, I have not been to your house in so long. Where is this placed? Spring is such a fun time isn't it! Keep crafting, it's such a great and rewarding thing, I think.
Post a Comment