Showing posts with label vintage-inspired. Show all posts

Tuesday, April 12, 2011

Vintage-Inspired Pennant Banner

Hello, Lovlies! I hope you are all doing well this morning. I was awoken this morning at 5:30 to the sound of birds chirping! The first time this year! So, this post is very appropriate, because it is all about Spring! Spring is my favorite time of year, the trees are just now starting to bud, the grass is getting more and more green every day!

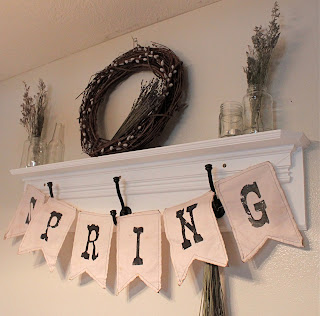
This is what this tutorial is for, isn't it stunning!?
I think so!
Step 1: Make your template. I just used a plain piece
of paper, folded in one inch on both sides, and cut out
a triangle on the bottom. Place your template over your
fabric, and make the cut (cut two if your fabric is thin)!
{FYI, I used the cheapest white muslin available}

Sew, sew, sew! This is an EXTREMELY easy sewing
project, it is all straight lines. I wanted the vintage-y look
so I didn't particularly care if the seams were not straight.
If your fabric is thick enough to not use two pieces, you
don't have to sew (obviously) but, you may want to,
it adds a little somethin' somethin' to it, ya know?


{I tea dyed my fabric in between these steps, and I was
too excited to even remember to take pictures. I used an
herbal tea, the flavor was Wild Berry, it gave the muslin
a slightly pink tint. Which at first I didn't like, but in the end
I thought it was great, and went well with my Spring theme}

I tried printing right onto my fabric, but it didn't work.
At all. I was very disappointed, but I found another
thing to use instead. Enter Iron-On T-Shirt Paper! {Tip:
I suggest printing it out on regular paper so you don't
waste your iron on paper. That way you can make sure
your text is the right size, and the right font for you.}
Use your paper according to manufacturer's directions.
They probably all ask for you to mirror your image though.
I used an Exacto knife to cut it out. {If you just cut
around the image, you'll end up with a clear/shiny
border that looks kinda mega tacky.}

Just another check to make sure
this is really what I wanted...

IRON IT ON, BABY!

Take a step back, and admire your labor of love.

I added another element to the pennants. I singed the edges
with a lighter, just enough to give it a faux patina.


I do this a lot. I love to look at what I've done so far, so
here's another pic of me admiring my awesomeness.

LAST STEP: Hot glue your string on to the backs of
your pennants, in your desired spacing. I chose hot glue
because if I should ever desire to move it, I may need to
re-do the spacing, and a dab of hot glue wouldn't be too
hard to remove.


And... hang it up! I am so in love with this project.
This is the one time that it turned out EXACTLY how I
wanted! I am so proud of myself. :}


My wonderful Dad made this shelf for me, he's the greatest.

And, I just love the hardware on it too!
Well, there you have it! Easy-peasy-lemon-squeezy. This is the one area in my house that I am completely happy with. So, let me know what you think!
What projects have you done to help you remember/celebrate Spring or Easter?
I do apologize for the red in the pictures, lighting in a condo isn't always the greatest... I would also LOVE it if you would follow my blog, it makes me so happy to get new friends, and establish new relationships!


Linking to: Anything You Want Wednesday at Free Pretty Things For You
Thrifty Thursdays 
Under $100 Party 
No Minimalist Here
White Wednesday 
Vintage Inspiration Fridays 
Air Your Laundry at Freckled Laundry
Flaunt it Friday at Chic on a Shoestring 
Show and Tell Friday 
Decor to Adore 
Weekend Wrap Up Party @ Tatertots and Jello

Related Posts Plugin for WordPress, Blogger...