Sunday, February 27, 2011

Tasty-not-go-to-Wasty Banana Bread


Banana bread, where to start? Delicious, moist, succulent, a piece of heaven. A few words to describe this recipe for banana bread. You may ask, "What's the difference?" I'll answer, "The streusel, my dear, the streusel." It makes it just absolutely delectable.  This recipe calls for walnuts in the bread, and the topping. I hate nuts, so I never put them in. This recipe comes from my Better Homes and Garden book.


2 c all-purpose flour               2 eggs, beaten 
1 1/2 tsp baking powder        1 1/2 c mashed, ripe banana (about 5 med)
1/2 tsp baking soda                1 C sugar
1/4 tsp salt                               1/2 c cooking oil, or melted butter or margarine
1/4 tsp ground cinnamon     1/4 chopped walnuts *optional
1/8 tsp ground nutmeg          1 recipe streusel nut topping *optional

Preheat oven to 350 degrees, grease bottom and sides of your bread pan, set aside. In a large bowl combine flour, baking powder, baking soda, salt, cinnamon, and nutmeg. Make a well in center of flour mixture; set aside.
In a medium bow combine, eggs, banana, sugar, and oil. Add egg mixture all at once to flour mixture. Stir just until moistened (batter should be lumpy) Fold in walnuts. Spoon batter into prepare pan, if desired, sprinkle Streusel-Nut Topping over batter in pans.
Bake for 55-60 minutes for a larger pan, or 40-45 a smaller one, or until toothpick inserted into the middle comes out clean. Cool in pan on a wire rack for 10 minutes, remove from pan. Cool completely on rack. Wrap; store overnight before slicing.

Streusel-Nut Topping: In a small bowl combine 1/4 c brown sugar and 3 tablespoons all-purpose flour. Using a pastry blender, cut in 2 Tablespoons buter until mixture resembles coarse crumbs, Stir in 1/3 c chopped walnuts.


Make sure to start out with brown-ish bananas, it tastes
way better if they are over-ripe.

This is what the streusel topping should look like.

Wonderful. Perfectly browned.


Wednesday, February 23, 2011

Painted Wallpaper


This project I had been planning for over a year. That's right, over a year and a half to be exact. I only started to work on it a few weeks ago though. It just took that long for me to find the right design, and have some extra time in between naps, feeding a toddler, taking care of my husband and house, and all of the other things that come with being a stay at home mom. (Don't get me wrong, though. I wouldn't change what I do for anything ever.)


Anyway, I found this template from here. I just printed it off, cut it out. Then I decided that it would take waaaaay to long to do with that itty bitty thing, so I traced it onto a 12 x 12 paper, then cut that out. 
This is what my room looked like when we bought our
condo, this pic was taken with our crappy camera so
you can't get the full effect of the ugliness that was this
particular color of yellow-ish-p


Here is my stencil all cut out, you'll notice that it got
ripped by a certain little boy... I just taped it, and it
worked just fine.

I love the grey color on my walls, but it was just so
boring, remember I have been living with BLANK walls
for a year and a half, I seriously needed some
decorating rehab.


Make sure to use a level, otherwise, your stencil will
turn a bit, and then make your wall looked like it is
bending, you don't want that...

Here it is, all penciled on!

If you must stop, make sure that you feather the paint
off, so it doesn't leave a line in the paint. I am OCD about
stuff being straight, and pretty much perfect, so that
really bothers me.
Oh how I love the finished project. Imagine artwork of
some kind on the wall, then a bunch of pillows on the
bed, and hopefully I can get those little babies
done soon!


Monday, February 21, 2011

Quick and Yummy


This is a deliciously yummy treat that I made twice in the past 2 nights. My husband loved it, and ate the first batch pretty much all by himself. I got smart and ate pretty much the whole second batch by myself! I usually try to do most everything that we eat made from scratch, but I was in the mood for some kind of sweet thing, and without spending the whole evening in the kitchen. This recipe takes about 15 minutes, (not including thaw time of the pastry sheets). Anyway, a friend of ours made something similar for us about a year and a half ago, and we loved it so much. I had no idea what it was called, or how to get that recipe; so I just made it up. 
Here's what you need:
  • Dulce de Leche (this is basically canned caramel, you find it in the Hispanic section. It comes in a can about the size of sweetened condensed milk, there is enough for 2-3 batches of this stuff)
  • About a 1/2 cup of milk  (if you wanted something more rich, you could use cream)
  • Puff pastry sheets
  • Berries of your choice

Preheat the oven to 350
       Roll out the thawed puff pastry on a lightly floured
       surface to desired thickness and cut into squares to put 
       into the muffin tins, I made mine kinda small so there 
       would be more treats to enjoy. If you wanted them to be
       about the size of the muffin tins, do about 4 per section of the 
       pastry sheets.
Place the squares of puff pastry into the muffin tins, I
sprayed mine with spray butter to be sure it wouldn't
stick to the pans.

Bake for 5-8 minutes. If you want the nice golden brown
color, brush a bit of butter over them.

I added 1/2 c of dulce de leche and 1/2 c of milk. Taste
it though before you put it over the pastry to see if it's
too rich, I wanted mine a bit sweeter, so I added a little
bit more to the mix. Then combine it all together with a
fork or whisk.


Drizzle the dulce de leche over the baked shells.

Add your berries, and enjoy! I think these are great both
warm and cold, we ate the leftovers for breakfast the next
morning, right out of the fridge. Very yummy!!

Sunday, February 20, 2011

Sneak Peek!

Here is a sneak peek of what a major project that I have been working on for a while.


Children's Art Smock

Hey everyone! I am really excited about this project. I did it without a pattern, it was VERY simple. I hope that the tutorial will make it easy for you to do the same!


Supplies you'll need for this project: Keep in mind that the fabric measurements are just a guesstimate, you may need more if your kid is bigger than mine.

  • About a yard of cute fabric
  • Vinyl (I got mine at Walmart. It is really cheap. Less than $2 a yard) I bought a yard, it was too much, but I'll have plenty for another project.
  • Bias tape one package (One package was exactly perfect for my son's size)
  • Of course you'll need a sewing machine, tape measure, scissors, and pins.

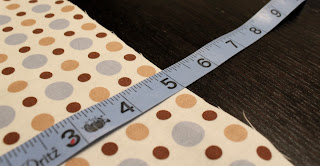
Measure your child, I wanted to make it a bit bigger so
that he could wear it for a while. I did 23" long by 14"
wide. But, You can adapt it anyway you want.

  The neck hole. I first did a rounded one, but changed it 
  to a squared neck. I am posting the rounded because it 
  would be way easier to put the bias tape on.

    The line for where the arms go,
  again adjust it to fit your child's needs.

The cut arm hole.

These are the straps that will be sewn onto the top to 
hold up the smock around his neck, and to tie around
his waist. I made mine 14" long and about 1 1/2" wide.

The steps I took for the straps are (from left to right): 
 1: Iron one side down, about 1/4" seams.
 2: Iron down the next side. 
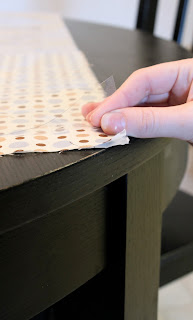
 3: Iron down the ends, you can also trim the corners so
     it would lay down more flat, according to your fabric.
 4: Fold the fabric in half and pin.


 The pocket: I made mine 11" x 5" remember to add for
                            seam allowance.

 For the pocket's seam allowance, I did the same as the
straps, 1/4", the bottom I did do a bit bigger, though.

Place the vinyl over the fabric, I 
placed mine so I would only have
to cut on two sides, instead of 4.

I traced the shape of the smock with a Sharpie.


Cut along the line. 

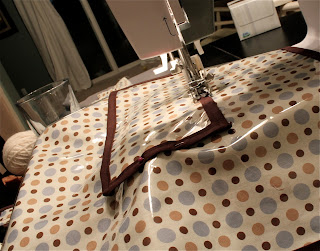
Pin the vinyl over the fabric with the bias tape. This was
my first time using bias tape, it was really easy to use, and made my job a LOT easier (I don't like HATE hemming.)


The end of the tape. I just folded it under, and
made it look pretty.

I try to do all of the sewing for the project around the
same time, for me it just works that way. I sewed on
the bias tape and did the straps at the same time.


Sew the strap onto the shoulder.

Pin and sew on the pocket. I also sewed a line down the
center of the pocket so that there was a divider to hold
his various art supplies.


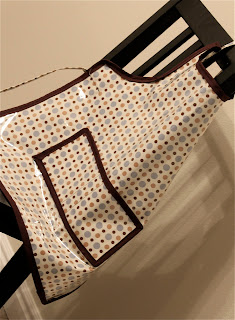
The finished project!

I have the next DaVinci on my hands!

The best part? Since there is vinyl over the fabric, I can
just wipe it down with a cloth and it's as good as new!

I hope that this tutorial was helpful to you. If you have any questions, email me and I'll be happy to get back to you.


Linking to Freckled Laundry
Related Posts Plugin for WordPress, Blogger...