Wednesday, July 6, 2011

Blueberry and Lemon Muffins- Scrumptious!


I. am. in. love. with these muffins. My mouth is watering just thinking about them again. I got these out of a cookbook that I just bought, it's called Deceptively Delicious, by Jessica Seinfeld. I changed it up a bit, and I am so glad I did, they turned out wonderfully!
Here's the recipe.

1/2 c back brown sugar
4 Tbsp margarine or butter
1 c lowfat plain yogurt
1 c blueberries
1/2 c applesauce
1 lg egg
2 tsp pure lemon extract
1 tsp grated lemon zest
2 cups flour (I did half of this with whole wheat flour, 
      and the other half with all purpose, 
      to make it just that much more healthy)
1/4 c flaxseed meal
1 tsp baking powder
1 tsp baking soda
 1/2 tsp salt-I actually omitted the salt

Preheat oven to 350 degrees Fahrenheit, use non-stick spray on your muffin tin, or use muffin wrappers. In a large bowl, beat the sugar and the margarine together, stir in the yogur, blueberries, applesauce, egg, lemon extract, and lemon zest. Add the flour, flaxseed meal, baking powder, baking soda, and salt. Stir just to comine, do not overmix- the batter should be lumpy. Divide batter into the muffin cups, bake until tops of muffins are lightly browned and center is baked through, about 13-16 minutes, let muffins cool. Store at room temperature in an airtight container for 2 days (or if your me, it took me about 5 days to eat these... they were just fine) or wrap individually and freeze for up to one month.


I am going to make them again tomorrow. These have jumped to the top of my favorite list, and if you know me, I am a muffin lovin' girl, so that's sayin' something! Enjoy!

Friday, June 24, 2011

Inspiration Day

Because sometimes, you just need some inspiration....


I do believe that most of these (if not all) came from Funky Junk Interiors. I should have saved that info, but I had planned on keeping them in my inspiration folder on my desktop. I never planned to share them. So, just to reiterate: THESE ARE NOT MY PICTURES. But I wish they were. So beautiful, lovely, calming, and they make me covet.  I think my favorite is the recipe cards. I am gonna find out how to make your own, because I don't think that I would hang up Grandma's recipes for the sun to damage, or get oil splattered on.
P.s. How do you like the new A Little Something, Too look? Much more my style. One day when I get a .com address, it will be even better. It's all planned in my head. It will happen one day, if I can convince my husband to work on it, that is!

Wednesday, June 22, 2011

Aunt Clara?

Do you remember Aunt Clara? You know, the really cool aunt from Bewitched who collected doorknobs? I kinda feel like her while I have been working on this project, haha! I love her character. So hilarious! (Yes, I do know what Bewitched is, just because I am 23 doesn't mean I don't know about the best show from the 1960's!)


Anyway, onto the actual post... This one has been in my "to-do" file for over a year. I am a procrastinator, I didn't want to have to take off the doorknobs, because let's face it, it's kind of a pain in the patootie. Well, I am here to tell you from experience, it really wasn't that bad at all. It's actually VERY easy, and quick {and CHEAP!}. 
Okay so I forgot to do a before picture, but you can kind of get the idea, right?


So, after you use this sandpaper on your removed-
from-the-door doorknob you'll end up with...
This! I don't know what the people
who lived here before us did, but
I would just like to know how they
put so many dents in a doorknob!
Take off the... what are these called anyway? I'll just
call them knob plates. So take them off, and sand them
just like you did on the door knobs.
And you'll end up with something like this.
Wipe down the knobs and plate
things with a paper towel, I used
a dry one, but wet would work too.
Anyway, you have to get off all
of the dust before they can be
painted. Woo hoo! Hard part
is now done!

You'll want to put the side with the
poles into some foam so you can
still get every angle with out putting
finer prints in the paint.
I just used flower foam (because it's
waaay cheaper).

Do the same with all of the screws.
Then... paint away! I used the Valspar Metallic Fast
Drying spray paint in silver.

While you're outside painting, and thinking of how beautiful your "new" doorknobs are going to be, don't forget to put the floral foam out of the reach of children, or this might happen.

My whole couch looked like this.
And he kinda looked like the Hulk,
except not muscly or huge.


After you let them dry, (and vacuum up all of the green
foam...) you'll end up with this beauty! A like-new,
beautifully painted doorknob.


 Can I just say how much I love my new knobs now? I seriously could not stand that brass look anymore. The brass just stared at me every time I used the doors, but now I just love them. Love them.


Report card:
Spray painted doorknobs (scale from 1-10; 1 being lowest, 10 highest)
How easy was this? 8.5 VERY easy
Was this a cheap project? 8- pretty cheap, I just paid $3 for the sand paper (I only used 1 sheet too!) and about $5-6 for the paint
Is it worth the time/energy/money? 10+++ I would even recommend if you are buying a new house to buy used knobs and paint them to save money.


Anyway, thank you so much for checking out my post, and I hope you found it as insightful and useful as I think it is. Loves!
Erin


Linking to:
Beyond the Picket Fence's Under $100
Whatever You Want Wednesday 
My Romantic Home 
Flaunt it Fridays 
Under $10 Tuesday 
Coastal Charm 
Wow Us Wednesday 
Home Stories A to Z

Saturday, June 4, 2011

Why I've been MIA

Hey everyone! I am truly sorry that I have been absent for a month (give or take). I promise I have a good reason but I'll get to that in a bit. I will be posting some really cool stuff in the coming days and weeks, so please don't get frustrated with me, and think that I abandoned you. 
You may recall that I went on a cruise a few weeks ago. Well, when I got home, you know you have way more laundry than you expected, the house is a total mess, even though you left it spotless. And how in the world can there be that many dishes in the sink? After the cruise-aftermath got cleaned up, I got some wonderful news. I am pregnant! We have been trying for 6 months, {which I know isn't long, but we have been wanting to get pregnant for about a year before that, but we had a few things that needed to be fixed before- I have depression, and I had to get those hormones fixed before I could add baby hormones to the mix}. So, here I am just as happy as could be, running around trying to figure out things like, where would we put the new baby? Is it a boy or a girl? If it's a girl, that means I'll have to clean out my craft room... That may be a problem. How will we be able to afford this baby? What if something went wrong? Etc etc etc. All kinds of things go through your mind when your family is going to get bigger.
All the while, I was thinking to myself, I have to get back to my blog, and just relax and de-stress with some crafting/homemaking and whatever else I post. Then, 4 days ago, I started spotting. Nothing to worry about, my friends said it happened to them, and everything turned out fine. I called the doctor and they wanted me to come in just for a routine check, to make sure that everything really is fine.
I met my husband at the dr's office, he just got done with his first job, and we were excited to get the first look at our new baby (2 weeks earlier than we thought!). When we got back to the exam room, and the dr. started the ultra sound. I looked at his face, he looked worried, and concerned. Then, he pointed to line and said, "This is where we look for the baby. I don't see a baby there. I am going to try to see if there is a tubal pregnancy {aka ectopic pregnancy}." He couldn't find any definite sign of a tubal pregnancy, so he said I had to go to the hospital to get blood work, and another ultrasound. Then he left us in the exam room. I started to get dressed, my husband said, "Are you okay?" And then I lost it. We weren't going to have a baby after all. The baby was gone, or it is where it shouldn't be, and I'd have to lose the baby anyway. My husband had to go to his other job on an emergency, so I went to the hospital with my 2 year old. Trying to hold it together, and being brave is a hard thing to do by yourself. So, they did the first round of blood work, and said they couldn't do the ultrasound until later that day. So, back to my house I went (which is a half hour away). That drive home was the hardest drive ever. I felt such sadness, but yet a very peaceful feeling as well.
The ultrasound at the hospital came back inconclusive as to whether I had an ectopic pregnancy or not, so I would have to come back to the hospital in two days to get the second half of my blood work done. 
The day before I was getting the blood work done, was a seriously hard day. I don't think I have cried harder in my life. I was aching for the child we lost. I kept thinking to myself, I will never be able to hold this child, hear it's laugh or cry, see if it would have brown or blue eyes, or if it's hair would be as red as my son's. My only consolation is my faith, the belief that I will be able to have an answer to all of these questions, and many, many more in the next life, Heaven. 
When I got the results of my blood work, I had lost 800 points of hCG, the hormone that the baby puts out. That means I did indeed lose the pregnancy, but they asked me to come in for another ultrasound. This time to see if there was still tissue, or if there were better clues as to where the pregnancy was. This one also came back inconclusive. Very frustrating to say the least. But, as I said before I felt peace, along with sadness, feeling of intense loss, and some guilt. 
I know that I will be able to see my child again one day, though not on this Earth. I know that my Heavenly Father is there, that He listens to my prayers, and answers them. I know that one day, I'll have answers as to why this happened. I know for now, I will have to content myself with knowing that this child just needed to have a body for a short time, and that it was a very choice soul, who was needed in Heaven to help spread the Gospel to people who have gone on before. I know that is why I have felt such peace, because my child is doing what our Heavenly Father wanted it to do. I will never forget my child, I will think of it daily. I will mourn the loss of it, and pray for it multiple times during the day, and be thankful for the wonderful son that we have with us here on Earth. 
To my child in Heaven: Mommy, Daddy and your brother miss you deeply, I am so sad that we won't be able to meet for a time, but I know you are where you should be. I can't wait for the day where I can hold you in my arms, and talk with you, and get to know you, not just as my child, but as a child of God. I love you, with all my heart, and I will never forget you. You'll forever be in my heart, and be a part of our lives. We love you! Until we meet, in Heaven!
Love, Mommy, Daddy, and Jude

Monday, May 2, 2011

Money Saver


Good morning to you! I hope you are enjoying your week. I am currently out of the country, sailing around Mexico in style, and enjoying wonderfully warm weather, sandy beaches, and plenty of food, and maybe even a spa treatment or two. Jealous? Do you want to go on a cruist too? Well, here's an idea to help you save for it! Homemade laundry soap. Okay before you say, "Uh, Erin... I am a clean-freak, and HAVE to use Tide {or whatever soap you love} or else my clothes will not get clean, smell nice, or put my OCD to rest." Well, never fear! I was that person too. Then, I had an epiphany one day; I needed to save money ANY way I could. I am lucky enough that I don't HAVE to work, but of course the extra money would be helpful. 

I used to coupon- epic fail. I would spend hours and hours and hours on the internet trying to find out what sales were going on, if I had coupons to match the sales, and yada yada yada... I would end up with an enormous anxiety attack. I kid you not; I would have anxiety attacks at the register. I could literally feel my blood pressure rise, my cheeks get hot and flushed, and leave the store with gigantic sweat rings under my pits, and start bawling in the car, because I didn't save as much as the Krazy Coupon Lady or something. Or just because I forgot to get something and I just didn't have the mental stamina to go all the way to the back of the store.

I do hair-sometimes. I am a licensed cosmetologist, I can do pretty much anything with hair, nails, waxing etc etc. Don't get me wrong, I LOVE doing that stuff. I miss working in the salon, in fact. But being a mommy is priority numero uno right now. And I don't do hair all that often. So those few times when I actually do have a client, I think it's great. My son, however, doesn't. He throws tantrums like nobody's business. Throws toys at whoever I am working on and their kids. And there is even the occasional streaking down the hall.

Well, I tried to save/earn some extra money, but those options just haven't worked out as well as I had hoped they would have. So I came up with a few ideas that wouldn't wreak me as a person, wouldn't leave clients with a severe aversion to coming to my home. I would make my own surface cleaner, laundry soap, and cook meals as often as possible and freeze the left overs, among other things. So the tip I wanted to share with you today is laundry soap. 

The great thing about this soap is, it smells fresh, it's cheap, and most importantly, it WORKS! I've been using it for some time now, and have not noticed any difference in my clothes' clean-ness. It received the OCD Approval award for actually getting my clothes clean. I actually use LESS soap than I was using with Tide, it's a really concentrated soap, and low suds formula so you can use it in a high efficiency washer. So, why not give it a shot?


Recipe for Homemade Laundry Soap
1 bar Ivory soap
1/2 c Washing Soda- NOT Baking Soda
1/2 c Borax

Grate the bar of Ivory, and mix all ingredients together. Place in an air-tight container.
I put the amount you use lower in the post... keep reading!
That's it. Easy huh?

You can see that there is a spoon here. I use that spoon to measure
my soap. Two spoonfuls for a large load, one spoonful for a small
load
. I made this dryer "tablecloth" because my dryer would get so
dirty. Like almost black. The lint catcher thing is inside the dryer,
and I was putting all of that messy lint in a box above the dryer to
take out to the trash, so I wouldn't have to go to the trash all the time.
I know I am lazy. But I can admit it.
Close-up of the soap. It's got great texture. I tripled the recipe too.
Isn't that cute? It was $7 at TJ Maxx.


 Well, I hope that you can use this, I definitely enjoy not having to spend $19 on a box that I will have to re-buy in 4-5 weeks. I'd much rather spend the $3.50 it costs for this soap {on average-if you triple it like me} every 9-10 weeks.
Squeezes!


Tuesday, April 26, 2011

My Sincere Apologies

I really owe you all an apology. My blogging of late has been non-existant. I've had a lot of things on my plate lately, and frankly the blog just wasn't my number one priority.  My husband is doing finals this week, and my son and I have been very sick. I had family stay over the weekend, it was Easter yesterday, and on Saturday we are leaving for a week-long cruise! So needless to say, I have been running around like a chicken without a head. {Is that imagery disgusting or what?} 
The weekend before last, we went up the canyon to do a photo shoot for my husband's class. While we were there, I snuck away with the camera to capture the wonder of God's beautiful Earth.


Anyway, I hope you can forgive my not-blogging-as-much-as-normal for the next little while, as we will be out of the country, I will try to get a post scheduled to be posted while I am gone. I will be posting a really cool recipe for making your own laundry soap and cleaner that has seriously saved my family tons of money, {and it's green, too!}  I hope that you loved these pictures as much as I do, and can find inspiration in your world as well.
Much love! 
Linking to: Whatever You Want Wednesdsay

Tuesday, April 12, 2011

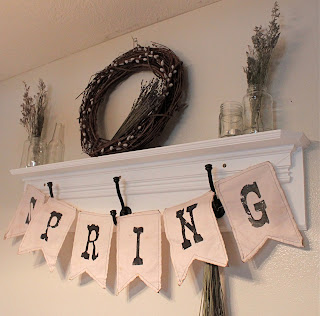
Vintage-Inspired Pennant Banner

Hello, Lovlies! I hope you are all doing well this morning. I was awoken this morning at 5:30 to the sound of birds chirping! The first time this year! So, this post is very appropriate, because it is all about Spring! Spring is my favorite time of year, the trees are just now starting to bud, the grass is getting more and more green every day!

This is what this tutorial is for, isn't it stunning!?
I think so!
Step 1: Make your template. I just used a plain piece
of paper, folded in one inch on both sides, and cut out
a triangle on the bottom. Place your template over your
fabric, and make the cut (cut two if your fabric is thin)!
{FYI, I used the cheapest white muslin available}

Sew, sew, sew! This is an EXTREMELY easy sewing
project, it is all straight lines. I wanted the vintage-y look
so I didn't particularly care if the seams were not straight.
If your fabric is thick enough to not use two pieces, you
don't have to sew (obviously) but, you may want to,
it adds a little somethin' somethin' to it, ya know?


{I tea dyed my fabric in between these steps, and I was
too excited to even remember to take pictures. I used an
herbal tea, the flavor was Wild Berry, it gave the muslin
a slightly pink tint. Which at first I didn't like, but in the end
I thought it was great, and went well with my Spring theme}

I tried printing right onto my fabric, but it didn't work.
At all. I was very disappointed, but I found another
thing to use instead. Enter Iron-On T-Shirt Paper! {Tip:
I suggest printing it out on regular paper so you don't
waste your iron on paper. That way you can make sure
your text is the right size, and the right font for you.}
Use your paper according to manufacturer's directions.
They probably all ask for you to mirror your image though.
I used an Exacto knife to cut it out. {If you just cut
around the image, you'll end up with a clear/shiny
border that looks kinda mega tacky.}

Just another check to make sure
this is really what I wanted...

IRON IT ON, BABY!

Take a step back, and admire your labor of love.

I added another element to the pennants. I singed the edges
with a lighter, just enough to give it a faux patina.


I do this a lot. I love to look at what I've done so far, so
here's another pic of me admiring my awesomeness.

LAST STEP: Hot glue your string on to the backs of
your pennants, in your desired spacing. I chose hot glue
because if I should ever desire to move it, I may need to
re-do the spacing, and a dab of hot glue wouldn't be too
hard to remove.


And... hang it up! I am so in love with this project.
This is the one time that it turned out EXACTLY how I
wanted! I am so proud of myself. :}


My wonderful Dad made this shelf for me, he's the greatest.

And, I just love the hardware on it too!
Well, there you have it! Easy-peasy-lemon-squeezy. This is the one area in my house that I am completely happy with. So, let me know what you think!
What projects have you done to help you remember/celebrate Spring or Easter?
I do apologize for the red in the pictures, lighting in a condo isn't always the greatest... I would also LOVE it if you would follow my blog, it makes me so happy to get new friends, and establish new relationships!


Linking to: Anything You Want Wednesday at Free Pretty Things For You
Thrifty Thursdays 
Under $100 Party 
No Minimalist Here
White Wednesday 
Vintage Inspiration Fridays 
Air Your Laundry at Freckled Laundry
Flaunt it Friday at Chic on a Shoestring 
Show and Tell Friday 
Decor to Adore 
Weekend Wrap Up Party @ Tatertots and Jello

Related Posts Plugin for WordPress, Blogger...